API |
| An Application Program Interface is a set of instructions (classes, functions and variables) to manipulate a program and create an application. Una API es una interface para manipular un programa por medio de un conjunto de instrucciones (clases, funciones y variables). |
Win32 |
| At the base of Microsoft Windows, Win32 is the native set of API's to create the fastest Microsoft Windows Programs. Win32 includes a set of very basic functions to manipulate: Windows, Files, Sockets, Graphics, etc. Win32 was originally created before computer languages could fully support Object Oriented programming. Nowadays, Win32 can be combined with Object Oriented Programming to create fast, easy to read programs as shown in this section. En la base de Microsoft Windows, Win32 es el conjunto nativo de APIs para crear los programas más rápidos en Microsoft Windows. Win32 incluye un conjunto de varias funciones básicas para manipular: Ventanas, Archivos, Socket, Gráficos, etc. Win32 fue originalmente creado antes de que los lenguajes de computadora pudieran suportar en forma completa la programación orientada a objetos. Hoy en día, Win32 se puede combinar con la programación orientada a objetos para crear programas rápidos que son fáciles de leer como se muestra en esta sección. |
| Tip |
| When using correctly and intelligently, the constructor and the destructor of a class can be used to simplify a program written using structured programming. Additionally, some variables that are used in structured programming as function parameters can become member variables to simply the function call. Cuando se usan en forma correcta e inteligente, el constructor y el destructor de una clase pueden ser usados para simplificar un programa escrito en programación estructurada. Adicionalmente, algunas variables que son usadas en programación estructurada como parámetros de una función pueden convertirse en variables miembro para simplificar la llamada a la función. |
| Description | Structured Programming | Object Oriented Programming |
| Memory request | Create a function for it (calling new or malloc) | Use class constructor |
| Memory release | Create a function for it (calling delete or free) | Use class destructor |
| Variable is frequently used | Use a global variable | Use member variable |
| Descripción | Programación Estructurada | Programación Orientada a Objetos |
| Solicitud de Memoria | Crear una función para esto (llamando new o malloc) | Use el constructor de la clase |
| Liberación de Memoria | Crear una function para esto (llamando delete o free) | Use el destructor de la clase |
| Una variable se usa frecuentemente | Use una variable global | Use una variable miembro |
| Problem 1 |
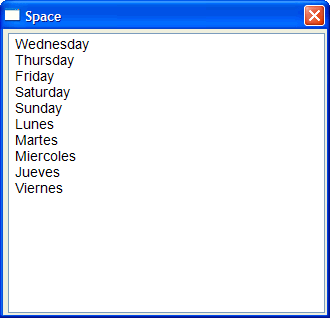
| Modify the Space program to create two arrays using dynamic memory and compute the output of the program. It is very easy to make mistakes when using dynamic memory, for instance we may forget to call delete to release the memory that was assigned by the new command. A good programmer will never write code similar to the code of this problem, instead he will create a class to ensure the proper calls to new and delete. Modifique el programa Space para crear dos arreglos usando memoria dinámica y calcule la salida del programa. Es muy fácil cometer errores cuando se usa la memoria dinámica, por ejemplo podemos olvidar llamar delete para liberar la memoria que fue asignada por medio del comando new. Un buen programador nunca escribirá código similar al usado en este problema, en su lugar el creará una clase para asegurar las llamadas apropiadas a new y delete. |
| Space.cpp |
| ... void Space::Window_Open(Win::Event& e) { double * x = new double[3]; if (x == NULL) return; double * y = new double[3]; if (y == NULL) { delete [] x; // If something goes wrong with y, then delete x before returning return; } wstring text; for(int i = 0; i<3; i++) { x[i] = 2.0*i+1.0; y[i] = 3.0*i+2.0; Sys::Format(text, L"%g, %g\r\n", x[i], y[i]); tbxOutput.Text += text; } delete [] x; delete [] y; } |
| Tip |
| At the moment that you add a member variable to a class, you must immediately initialize it in the constructor of the class. En el momento que usted agregue una variable miembro a una clase, usted debe inmediatamente inicializarla en el constructor de la clase. |
| Tip |
| When you convert a structure programming code to OOP, you must move part of your code from the main file to the class files. Cuando usted convierte un código de programación estructurada a POO, usted debe mover parte del código desde el archivo principal a los archivos de la clase. |
| Problem 2 |
| The code in the previous problem may be simplified by the use of the Object Oriented Programming. Add the MyArray class to the Space project as shown below. El código en el problema anterior puede ser simplificado con el use de la programación orientada a objetos. Agregue la clase MyArray al proyecto Space como se muestra debajo. |
| MyArray.h |
| #pragma once class MyArray { public: MyArray(void); MyArray(int count); ~MyArray(void); // data is the x and y of the previous problem double *data; int count; }; |
| MyArray.cpp |
| #include "StdAfx.h" #include "MyArray.h" MyArray::MyArray(void) { data = NULL; count = 0; } MyArray::MyArray(int count) { data = new double[count]; // if (data == NULL) throw L"No enough memory"; if (data != NULL) { this->count = count; } else { this->count = 0; } } MyArray::~MyArray(void) { if (data != NULL) delete [] data; } |
| Space.cpp |
| ... void Space::Window_Open(Win::Event& e) { MyArray x(3), y(3); wstring text; for(int i = 0; i<3; i++) { x.data[i] = 2.0*i+1.0; y.data[i] = 3.0*i+2.0; Sys::Format(text, L"%g, %g\r\n", x.data[i], y.data[i]); tbxOutput.Text += text; } } |
| Problem 3 |
| Compare the code of problem 1 (structured programming) with the code of problem 2 (object oriented programming). List two advantages and two differences of using the OOP vs. structure programming. Compare el código del problema 1 (programación estructurada) con el código del problema 2 (programación orientada a objetos). Liste dos ventajas y dos diferencias de usar la POO contra la programación estructurada. |
| Problem 4 |
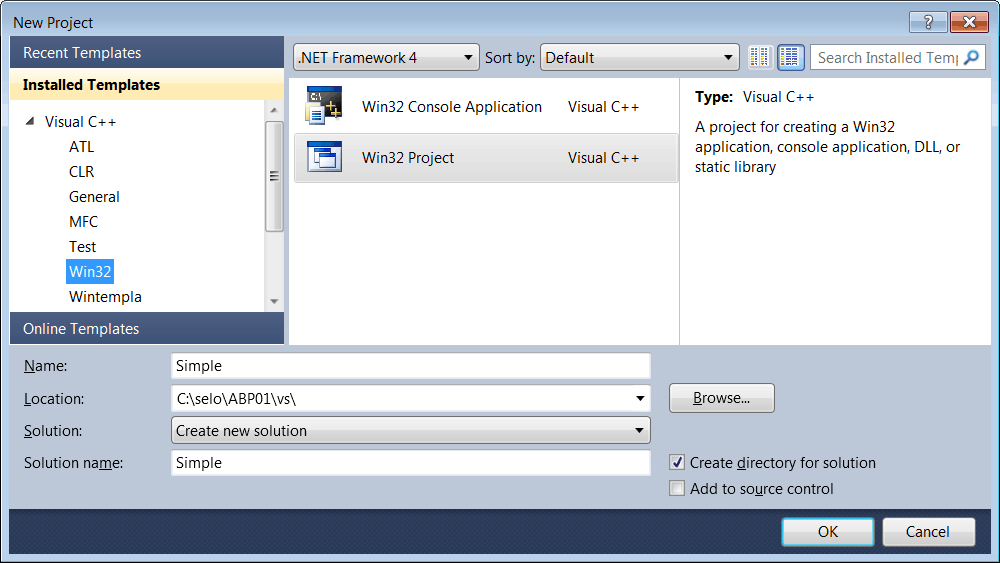
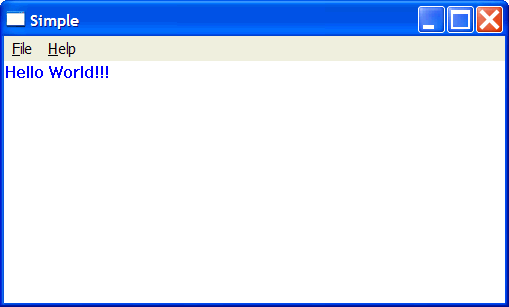
| Create a Win32 project (Windows desktop application) called Simple as shown below. The Wizard will generate a basic project using structured programming. Note the use of global variables and functions. Most of the code may be added in the Simple.h and Simple.cpp files. In very complex projects, a programmer eventually will lose track of what he is doing, if he uses a Win32 project. Find the WndProc function and modify it as shown below. Cree un proyecto de Win32 (Aplicación de Escritorio de Windows) llamado Simple como se muestra debajo. El asistente generará un proyecto básico usando la programación estructurada. Note el uso de las variables y funciones globales. La mayoría del código puede agregarse en los archivos Simple.h y Simple.cpp. En proyectos muy complejos, un programador eventualmente perderá el sentido de lo que está haciendo, si el usa un proyecto de Win32. Encuentre la función WndProc y modifiquela como se muestra debajo. |
| Simple.cpp |
| ... // // FUNCTION: WndProc(HWND, UINT, WPARAM, LPARAM) // // PURPOSE: Processes messages for the main window. // // WM_COMMAND - process the application menu // WM_PAINT - Paint the main window // WM_DESTROY - post a quit message and return // // LRESULT CALLBACK WndProc(HWND hWnd, UINT message, WPARAM wParam, LPARAM lParam) { PAINTSTRUCT ps; HDC hdc; //_____________________ ADD THIS LINE const wchar_t * helloText = L"Hello World!!!"; switch (message) { case WM_PAINT: hdc = ::BeginPaint(hWnd, &ps); // TODO: Add any drawing code here... ::SetTextColor(hdc, RGB(0, 0, 255)); // ________________ ADD THIS LINE ::TextOut(hdc, 0, 0, helloText, wcslen(helloText));//____________ADD THIS LINE ::EndPaint(hWnd, &ps); break; case WM_DESTROY: PostQuitMessage(0); break; default: return DefWindowProc(hWnd, message, wParam, lParam); } return 0; } |
| Problem 5 |
| In the previous problem, add the MyGraphics class to the project to simplify the painting code. We will move some of the code from the WM_PAINT case to the MyGraphics class. Observe how the constructor makes the call to BeginPaint, while the destructor makes the call to EndPaint. En el problema previo, agregue la clase MyGraphics al proyecto para simplificar el código de pintado. Nosotros moveremos parte del código del case WM_PAINT a la clase MyGraphics. Observe como el constructor hace la llamada a BeginPaint, mientras que el destructor hace la llamada a EndPaint. |
| MyGraphics.h |
| #pragma once class MyGraphics { public: MyGraphics(HWND hWnd); ~MyGraphics(void); void TextOut(int x, int y, const wchar_t* text); void SetTextColor(COLORREF color); private: PAINTSTRUCT ps; HDC hdc; HWND hWnd; }; |
| MyGraphics.cpp |
| #include "StdAfx.h" #include "MyGraphics.h" MyGraphics::MyGraphics(HWND hWnd) { this->hWnd = hWnd; hdc = ::BeginPaint(hWnd, &ps); } MyGraphics::~MyGraphics(void) { ::EndPaint(hWnd, &ps); } void MyGraphics::TextOut(int x, int y, const wchar_t* text) { ::TextOut(hdc, x, y, text, wcslen(text)); } void MyGraphics::SetTextColor(COLORREF color) { ::SetTextColor(hdc, color); } |
| Simple.h |
| #include "MyGraphics.h" ... |
| Simple.cpp |
| ... LRESULT CALLBACK WndProc(HWND hWnd, UINT message, WPARAM wParam, LPARAM lParam) { switch (message) { case WM_PAINT: { MyGraphics graphics(hWnd); graphics.SetTextColor(RGB(0, 0, 255)); graphics.TextOut(0, 0, L"Hello World!!!"); } break; case WM_DESTROY: PostQuitMessage(0); break; default: return DefWindowProc(hWnd, message, wParam, lParam); } return 0; } |
| Tip |
Let us quickly review how the MyGraphic class (in the previous problem) was created.
Repasemos en forma rápida como se creó la clase MyGraphics (en el problema previo).
|
| Problem 6 |
| Modify your Space project by adding the MyPoint class as shown. Modifique su proyecto Space agregando la clase MyPoint como se muestra. |

| Space.cpp |
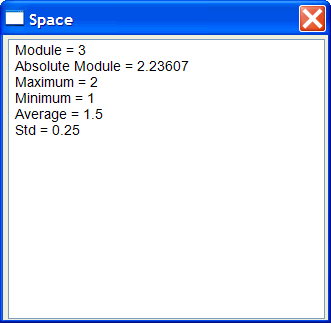
| ... void Space::Window_Open(Win::Event& e) { MyPoint p1; p1.x = 1.0; p1.y = 2.0; wstring text; Sys::Format(text, L"Module = %g\r\n", p1.GetModule()); tbxOutput.Text += text; // Sys::Format(text, L"Absolute Module = %g\r\n", p1.GetAbsModule()); tbxOutput.Text += text; // Sys::Format(text, L"Maximum = %g\r\n", p1.GetMax()); tbxOutput.Text += text; // Sys::Format(text, L"Minimum = %g\r\n", p1.GetMin()); tbxOutput.Text += text; // Sys::Format(text, L"Average = %g\r\n", p1.GetAverage()); tbxOutput.Text += text; // Sys::Format(text, L"Std = %g", p1.GetStd()); tbxOutput.Text += text; } |
| Problem 7 |
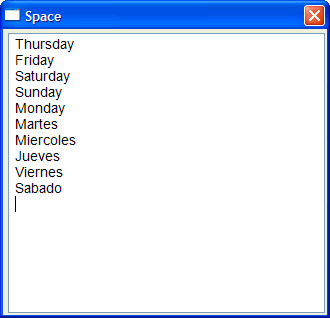
| Modify your Space project by adding the RandomDay class as shown. The class has a function called Get. The first time the function is called, it returns the name of random day of the week. The next call to the function will return the name of the next day that it returned in the previous call. Modifique su proyecto Space agregando la clase RandomDay como se muestra. La clase tiene una sola función llamada Get. La primera vez que la función es llamada, esta regresa el nombre de un día aleatorio de la semana. La próxima llamada a la función regresara el nombre del día siguiente que regresó en la llamada previa. |
| RandomDay.h |
| #pragma once class RandomDay { public: RandomDay(void); ~RandomDay(void); enum Language { english, spanish }; const wchar_t* Get(); Language language; private: const wchar_t *GetDayName(int day); const wchar_t *GetNombreDia(int day); int currentDay; }; |
| RandomDay.cpp |
| ... RandomDay::RandomDay(void) { srand(::GetTickCount()); ... } RandomDay::~RandomDay(void) { } const wchar_t* RandomDay::Get() { ... } const wchar_t *RandomDay::GetDayName(int day) { ... return L"Error"; } const wchar_t *RandomDay::GetNombreDia(int day) { ... return L"Error"; } |
| Space.cpp |
| ... void Space::Window_Open(Win::Event& e) { RandomDay rd; for(int i = 0; i < 5; i++) { tbxOutput.Text += rd.Get(); tbxOutput.Text += L"\r\n"; } rd.language = RandomDay::spanish; for(int i = 0; i < 5; i++) { tbxOutput.Text += rd.Get(); tbxOutput.Text += L"\r\n"; } } |
| Tip |
| To convert a program from structured programming to object-oriented programming, you must look for lines of code that are similar in several parts of your program. Para convertir un programa que usa programación estructura a uno con programación orientada a objetos, usted debe buscar por líneas de código que son similares en varias partes del programa. |
| Problem 8 |
We will create a simple calculator using Win32. Then, we will create a class to simplify the use of textbox in Win32.
Nosotros crearemos una calculadora simple usando Win32. Entonces, crearemos una clase para simplificar el uso de las cajas de texto en Win32.
|
| Solution 8.a |
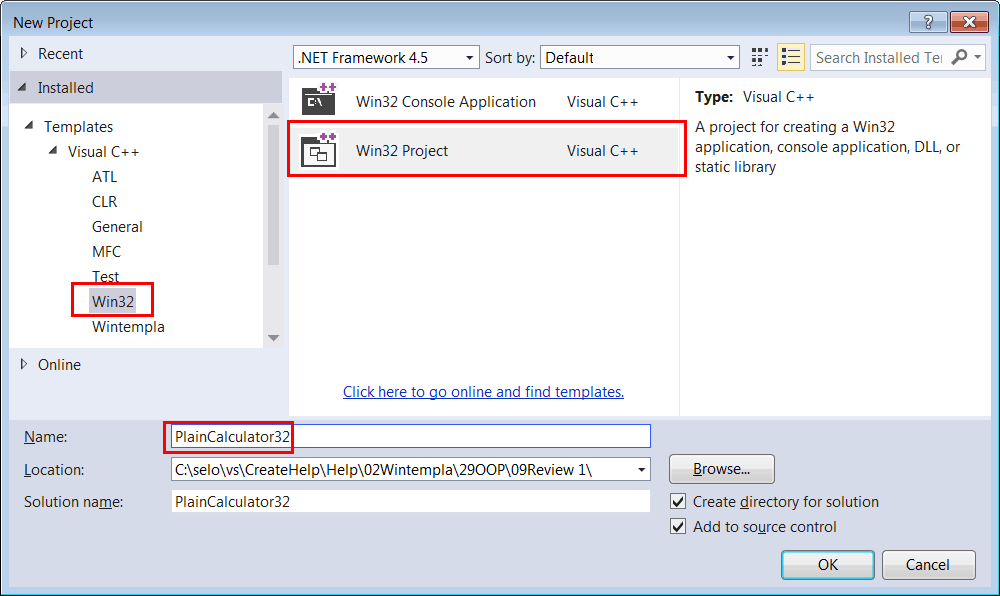
| In the menu: File > New > Project... > Visual C++ > Win32 > Win32 Windows Application En el menú: Archivo > Nuevo > Proyecto... > Visual C++ > Win32 > Win32 Windows Application |
| Solution 8.b |
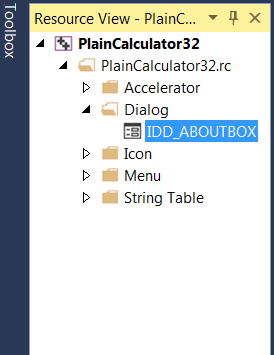
| In the menu: View > Resource View. Expand the Tree view control as shown. Desde el menú: View > Resource View. Expanda la vista de árbol como se muestra. |
| Solution 8.c |
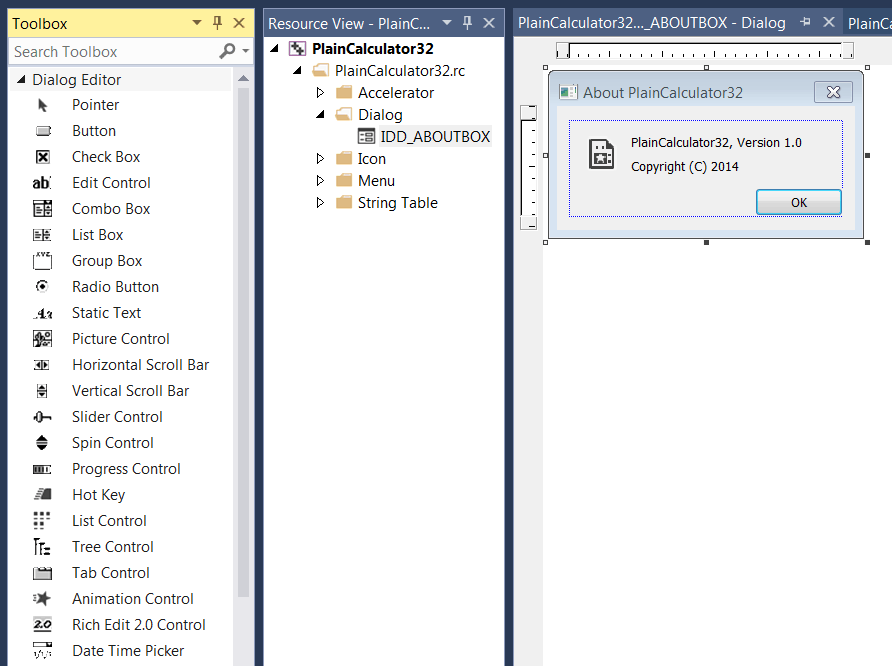
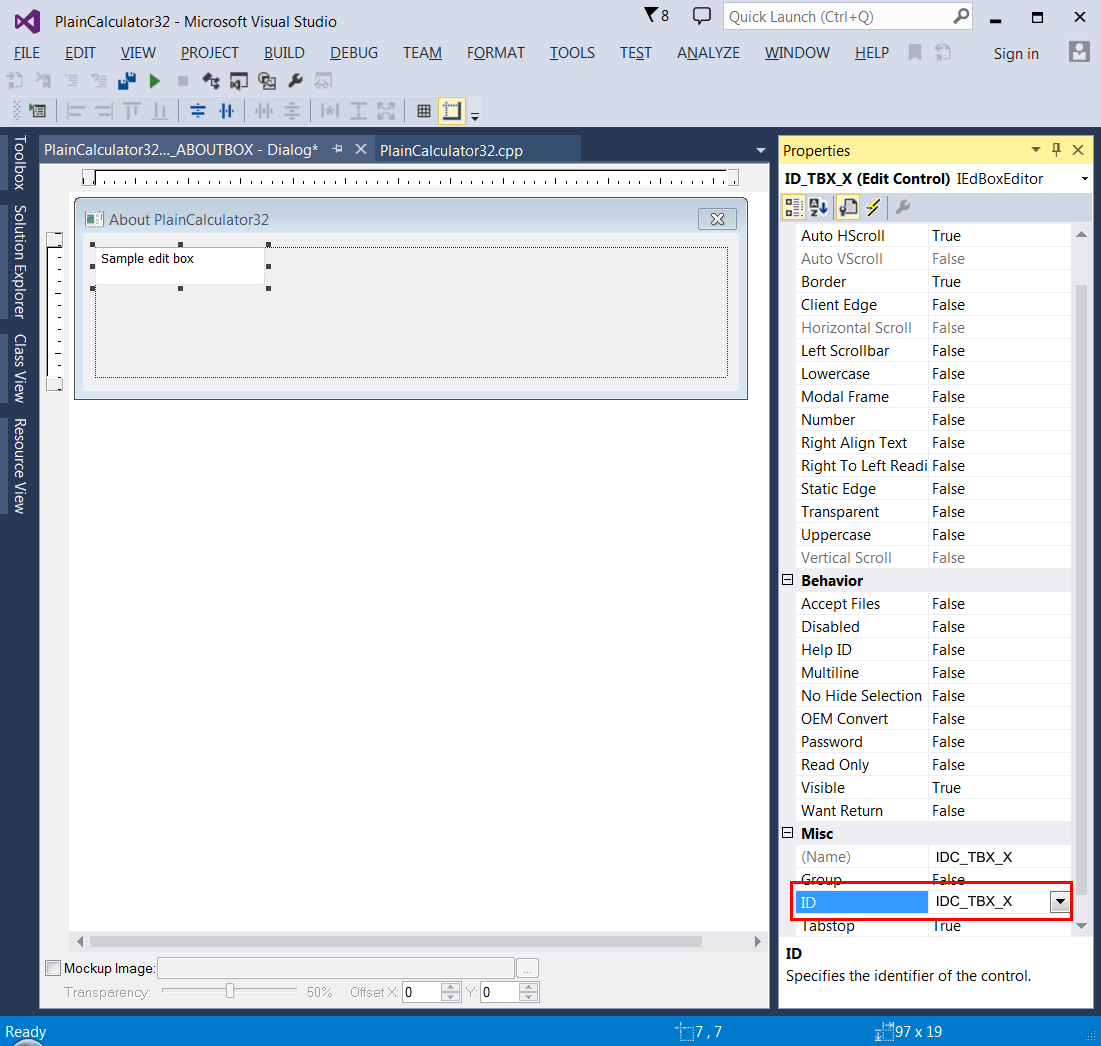
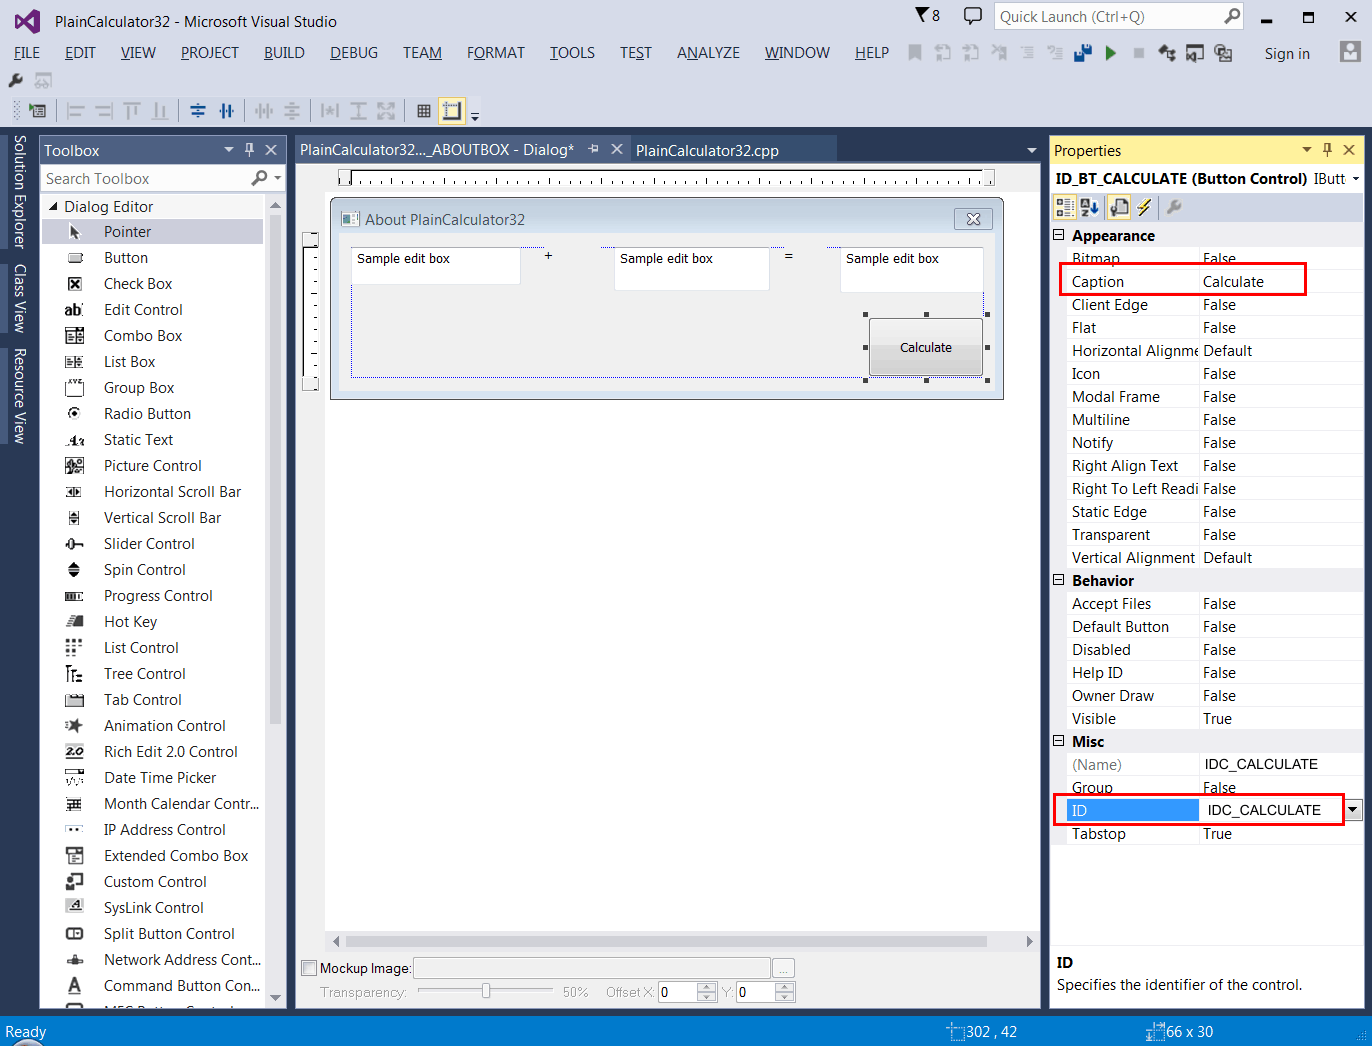
| From the Resource View expand the Dialog node and double click the IDC_ABOUTBOX. Desde la Vista de Recursos expanda el nodo de Dialog y haga doble click en IDC_ABOUTBOX. |
| Solution 8.d |
|
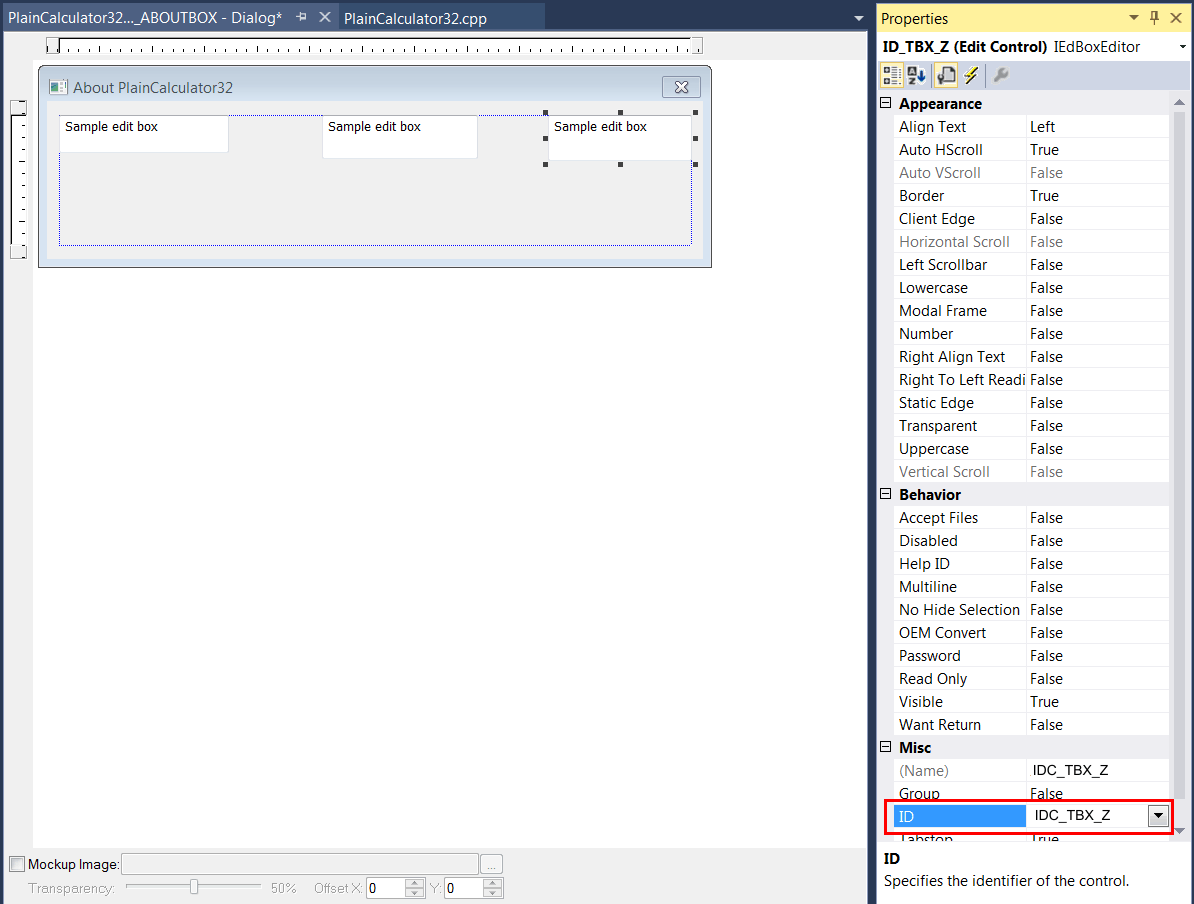
| Solution 8.e |
|

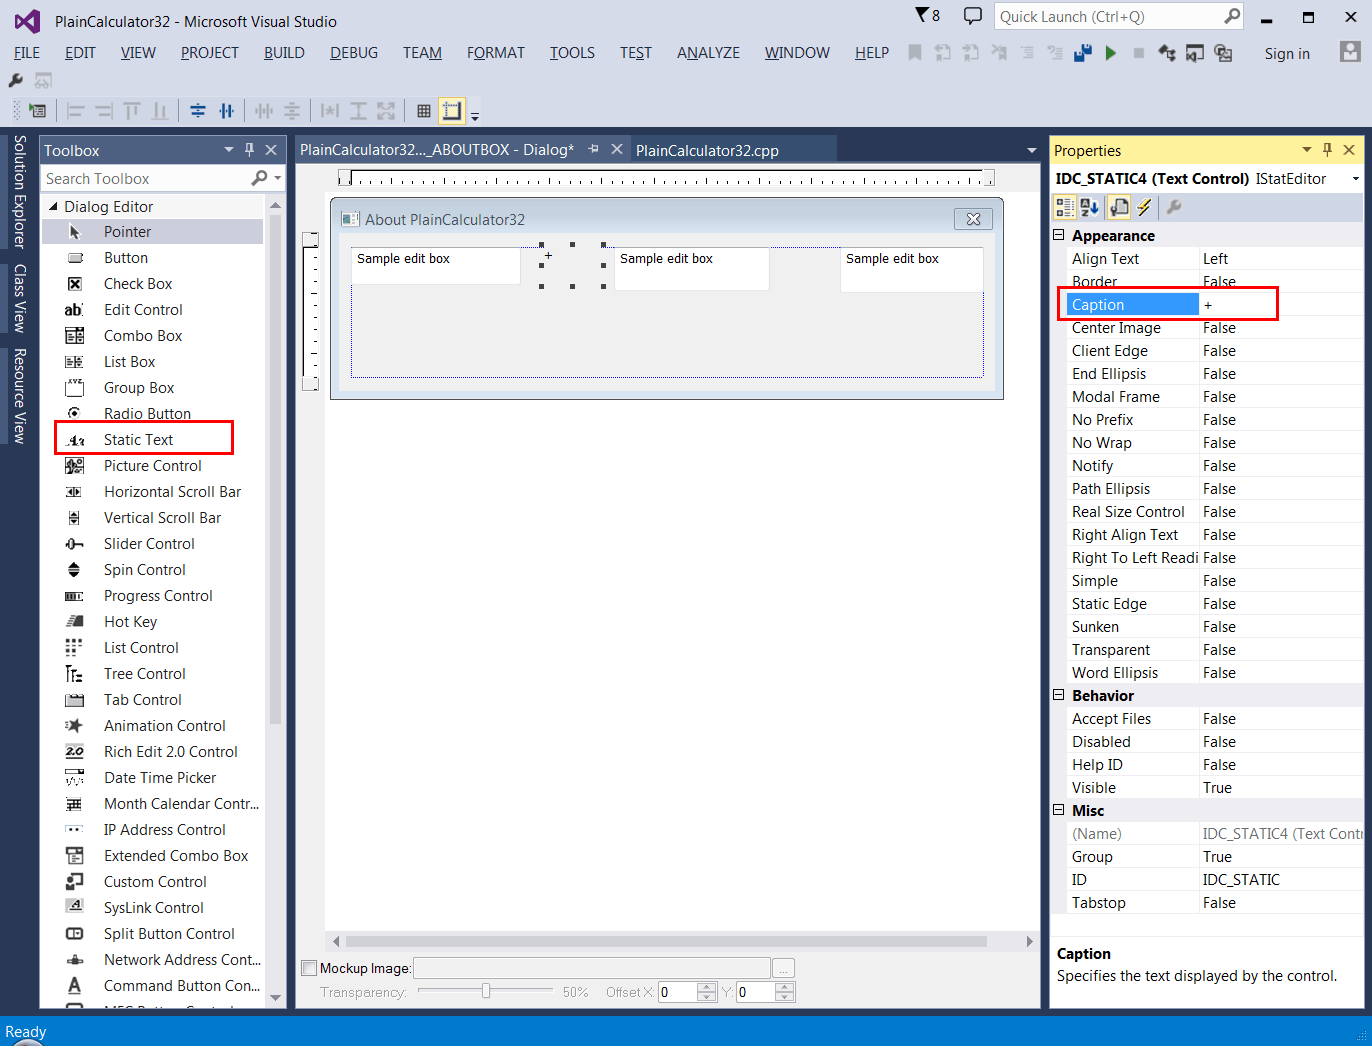
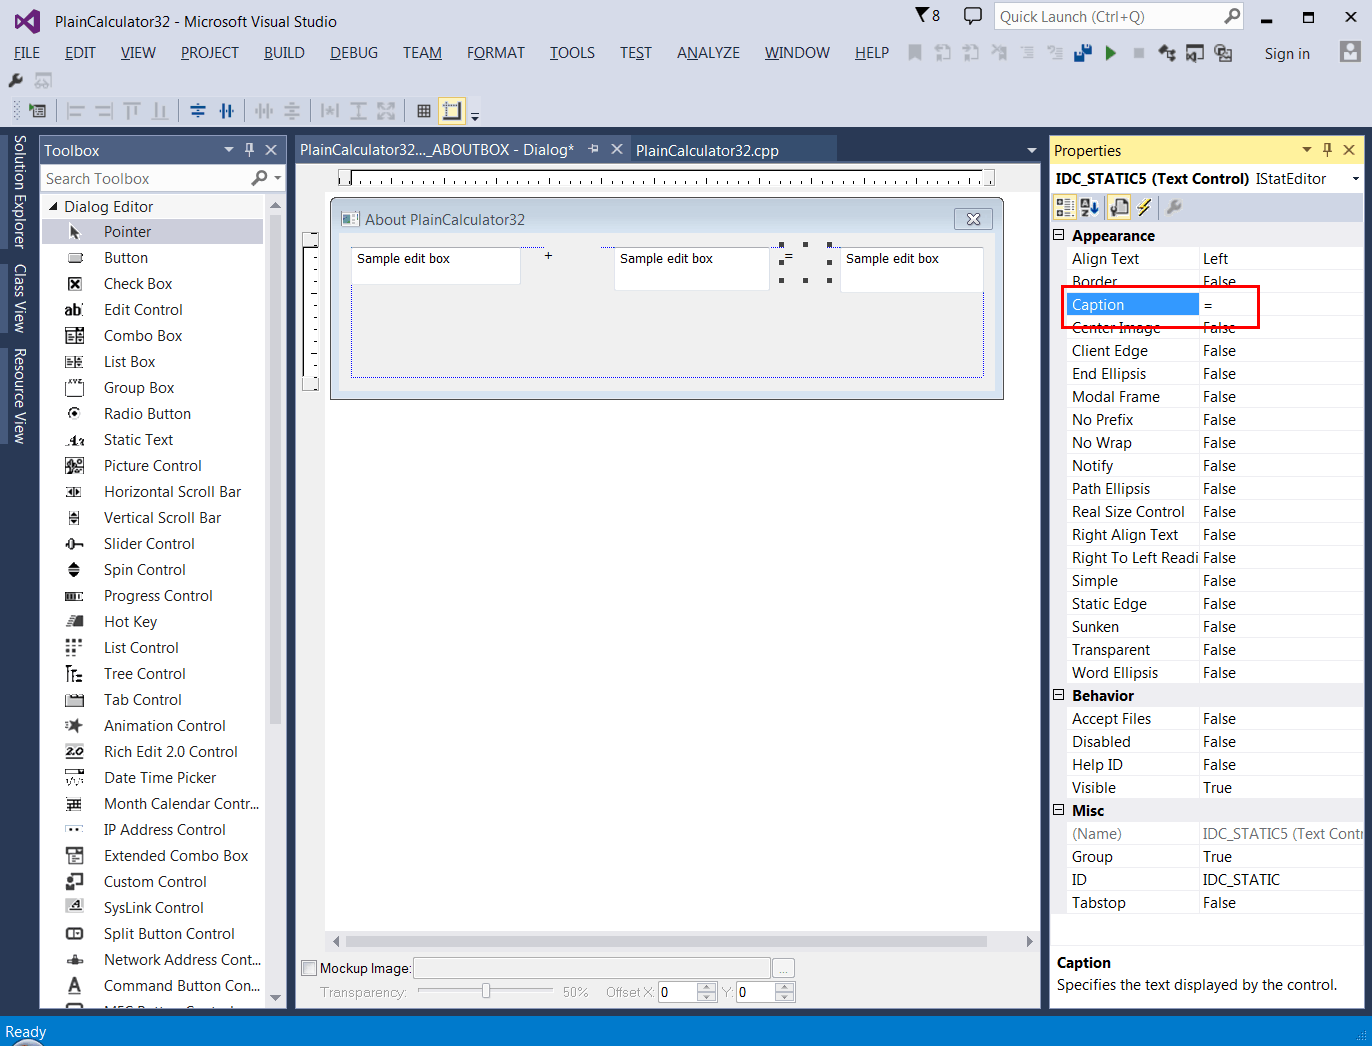
| Solution 8.f |
|
| Solution 8.g |
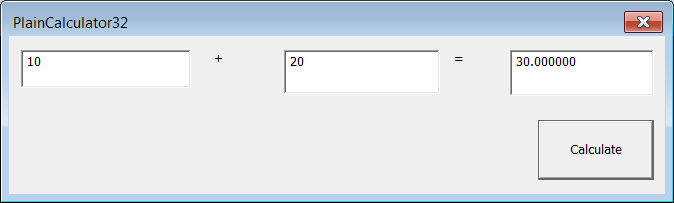
| Edit the PlainCalculator32.cpp file as shown. Run the program. Edite el archivo PlainCalculator32.cpp como se muestra. Corra el programa. |
| PlainCalculator32.cpp |
| //_________________________________________________ PlainCalculator32.cpp #include "stdafx.h" #include "PlainCalculator32.h" #include "resource.h" INT_PTR Window_Open(HWND hWnd, WPARAM wParam, LPARAM lParam) { ::SetWindowText(hWnd, L"PlainCalculator32"); return TRUE; } INT_PTR btCalculate_Click(HWND hWnd, WPARAM wParam, LPARAM lParam) { wchar_t text[32]; //_______________________________ x = tbxX.GetDouble() or x = tbxX.DoubleValue; HWND hWndTbxX = ::GetDlgItem(hWnd, IDC_TBX_X); ::GetWindowText(hWndTbxX , text, 32); const double x = _wtof(text); //_______________________________ y = tbxY.GetDouble() or y = tbxY.DoubleValue; HWND hWndTbxY = ::GetDlgItem(hWnd, IDC_TBX_Y); ::GetWindowText(hWndTbxY, text, 32); const double y = _wtof(text); // const double z = x + y; //_______________________________ tbxZ.SetDouble(z) or tbxY.DoubleValue = z; _snwprintf_s(text, 32, _TRUNCATE, L"%f", z); HWND hWndTbxZ = ::GetDlgItem(hWnd, IDC_TBX_Z); ::SetWindowText(hWndTbxZ , text); return TRUE; } INT_PTR CALLBACK WndProc(HWND hWnd, UINT message, WPARAM wParam, LPARAM lParam) { switch (message) { case WM_INITDIALOG: return Window_Open(hWnd, wParam, lParam); case WM_COMMAND: if (LOWORD(wParam) == IDC_CALCULATE) return btCalculate_Click(hWnd, wParam, lParam); if (LOWORD(wParam) == IDCANCEL) ::EndDialog(hWnd, 0); break; } return (INT_PTR)FALSE; } int APIENTRY _tWinMain(HINSTANCE hInstance, HINSTANCE, LPTSTR cmdLine, int cmdShow) { ::DialogBox(hInstance, MAKEINTRESOURCE(IDD_ABOUTBOX), NULL, WndProc); return 0; } |
| Problem 9 |
| Add and implement the class MyTextbox to the project of the previous problem to simplify the code using the OOP. Agregue e implemente la clase MyTextbox al proyecto del problema previo para simplificar el código usando la POO. |
| PlainCalculator32.cpp |
| //_________________________________________________ PlainCalculator32.cpp #include "stdafx.h" #include "PlainCalculator32.h" #include "MyTextbox.h" INT_PTR Window_Open(HWND hWnd, WPARAM wParam, LPARAM lParam) { ::SetWindowText(hWnd, L"PlainCalculator32"); return TRUE; } INT_PTR btCalculate_Click(HWND hWnd, WPARAM wParam, LPARAM lParam) { MyTextbox tbxX(hWnd, IDC_TBX_X); MyTextbox tbxY(hWnd, IDC_TBX_Y); MyTextbox tbxZ(hWnd, IDC_TBX_Z); const double x = tbxX.DoubleValue; // It internally calls tbxX.GetDouble(); const double y = tbxY.DoubleValue; // It internally calls tbxY.GetDouble(); tbxZ.DoubleValue = x + y; // It internally calls tbxZ.SetDouble(...); return TRUE; } INT_PTR CALLBACK WndProc(HWND hWnd, UINT message, WPARAM wParam, LPARAM lParam) { switch (message) { case WM_INITDIALOG: return Window_Open(hWnd, wParam, lParam); case WM_COMMAND: if (LOWORD(wParam) == IDC_BT_CALCULATE) return btCalculate_Click(hWnd, wParam, lParam); if (LOWORD(wParam) == IDCANCEL) ::EndDialog(hWnd, 0); break; } return (INT_PTR)FALSE; } int APIENTRY _tWinMain(HINSTANCE hInstance, HINSTANCE, LPTSTR cmdLine, int cmdShow) { ::DialogBox(hInstance, MAKEINTRESOURCE(IDD_ABOUTBOX), NULL, WndProc); return 0; } |
| MyTextbox.h |
| #pragma once class MyTextbox { public: MyTextbox(HWND hDlg, int ID); ~MyTextbox(void); double GetDouble(); void SetDouble(double value); __declspec( property( get=GetDouble, put=SetDouble) ) double DoubleValue; private: HWND hTbx; }; |